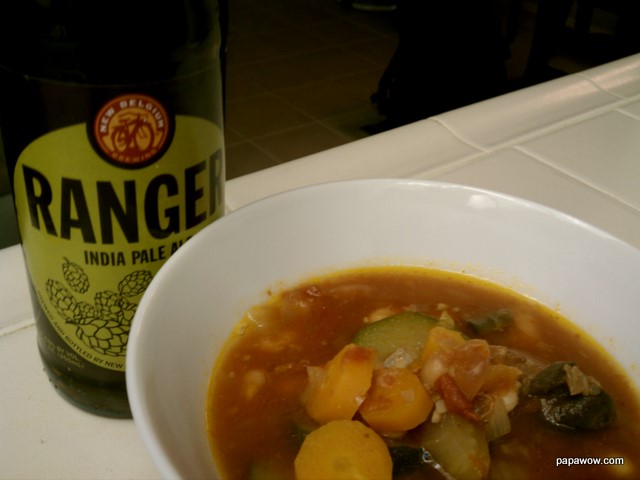
Being the cheapskate that I am, I loaded up on dried beans at the health food store the other day.  Pinto, black, fava, and just for kicks I grabbed two kinds that I've never worked with before: mung and adzuki.  I've been making curry with lentils for so long and calling it Dhal that I didn't even realize Dhal could be made with mung beans.

I discovered a recipe over at Lisa's Kitchen for Creamy Mung Dal Curry while Googleing "what do I do with mung beans?" and thank the lard, because her recipe sounds fantastic.  I made a variation and even though this is quite different from Lisa's I used hers as a base.

Once you plan ahead enough to soak the mung beans the night before, this comes together pretty easily.  There is another hour or so of cook time, but there isn't much meddling.  If you don't use butter, like I did, it can be vegan. 

Ingredients: 

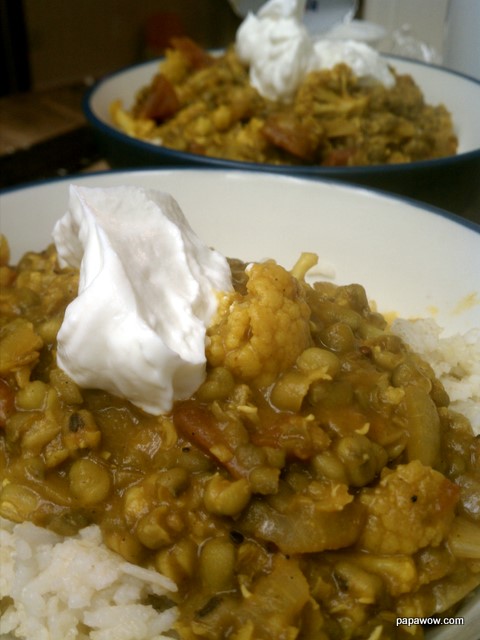
  • 1 pound of cauliflower, washed and chopped into 2 inch sized pieces
  • 1 cup mung beans, soaked in water overnight 
  • 2 teaspoons cumin seeds
  • 1 teaspoon turmeric
  • 1 teaspoon curry powder
  • 1 teaspoon mustard seeds
  • 1/2 teaspoon cayenne
  • 1/2 teaspoon powered ginger
  • 1 can tomatoes
  • 1 can of coconut milk
  • 1 can tomato paste
  • juice of 1 lemon
  • salt & pepper to taste

Pre-heat the oven to 400.  Toss the cauliflower with a little olive oil, salt and pepper.  Place in the oven and roast until the edges of the florettes brown, about 30 minutes.

The technique is a straight-foward curry.  In a large pot over medium-high heat, bloom the spices in about 2 tablespoons of oil stirring often.  I used 1 tablespoon each of butter and olive oil but you can use anything you like. Have the tomato paste ready and once things start to smoke, about 4 minutes in, dump the paste in and stir like crazy.  

Cook the paste for a few minutes, stirring continuously and add the can of tomatoes and the coconut milk once the paste starts to stick to the pot.  Add the beans and enough water to cover them, if necessary.  

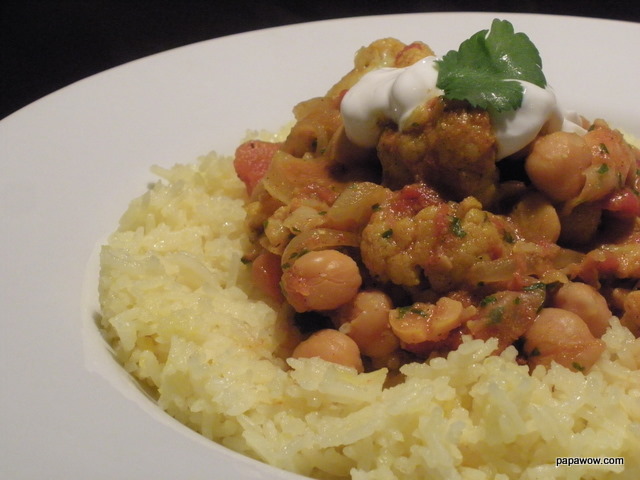
Bring to a boil and then reduce to a simmer.  Cook until the beans are soft, 40-65 minutes. When the cauliflower is roasted, stir them into the mung beans.

Once the mung beans are soft, serve over Coconut Saffron Basmati Rice, wrap in tortillas for Awesome Dhal Burritos, or serve in lettuce wraps.  Top with a dollop of yogurt and curl up to a bad comedy.

Serves 4

Posted
Authordavid koch
CategoriesRecipes
Share

 Ham Bone and Pinto Bean Soup

My husband ended up with an unusual gift this year from the white elephant Christmas exchange at his work........a HAM!

I guess we were the perfect people to receive such a gift as we cooked it right up and saved the ham bone for further use. I was craving a home cooked comforting soup the other night and got this going on the stove.

I used pinto beans because we had a giant bag of them sitting around but it would also be great with cannellini beans or navy beans. This is the perfect soup on a cold winter evening. Enjoy!

Ham Bone and Pinto Bean Soup
  • 1 yellow onion, chopped
  • 2 stalks celery, chopped
  • 3 carrots, peeled and chopped
  • 3 garlic cloves, coarsly chopped
  • 1 can chopped tomatoes
  • 1 ham bone with some ham left on it
  • 10 cups water or chicken broth (or combination)
  • ½ teaspoon herbs de provence
  • 1 bay leaf
  • 2 cups dried pinto beans, sorted and soaked overnight

In a large pot, heat 1 tablespoon olive oil on medium heat and add onion, celery and carrots. Saute until vegetables soften, about 5-7 minutes. Add garlic and chopped tomatoes. Cook for an additional 2-3 minutes. Add ham bone, water/broth, herbs de provence, and bay leaf.
If the ham bone is not covered add some additional water.

Bring liquid up to a boil then lower heat and let simmer for 1 hour. Stir in beans and cook for an additional 2 hours. Remove ham bone and pull off any remaining meat. Chop the meat into desired size and add back into the soup.

Check soup for seasonings and add salt and pepper to taste. Serve warm.

Optional garnishes: Top soup bowls with grated Parmesan cheese and a drizzle of olive oil or pass around some of your favorite hot sauce.

Serves 6


Posted
AuthorAmy Koch
CategoriesRecipes
Tagsrecipe
Share

Tomato and Corn Chowder with Thyme

With an abundance of tomatoes right now thanks to my father in-law and Avalon Hill (thanks!), we thought Joanne Weir's "Tomato and Corn Chowder" would be a quick, easy, healthy way to use them all before they went to waste.  This recipe came sirendipitly into our email inbox last week; she's a gem, and you can sign up for her newsletter here.

Like everything, I can't just leave well enough alone so I made some modifications.  Instead of the chives, I added some thyme because I just felt like it needed a little stronger herbal touch.  I used more tomatoes and didn't drain or seed them.  I added more butter, less water, and I also cooked it for a little longer.

The result is a hearty, yet summer-y and vegeterian chowder that makes a great meal, especially served with some toasted crusty bread.  If you were to use olive oil instead of butter, you could make it vegan.

Here is our variation:

2 large Russett potatoes, peeled, cut into 1/2-inch dice
2 tablespoon butter
1 yellow onion, minced
3 cups chicken stock
6 ears of fresh corn, shucked, kernels removed 
1/2 cup heavy cream
7 ripe medium-size red tomatoes, peeled and chopped
salt and freshly ground pepper
3-4 sprigs of thyme

Bring a large pot three-quarters full of salted water to a boil.  Add the potatoes and cook until tender, 10 minutes.  Prep everything else while the potatoes cook.  Drain and reserve.  

Melt 2 tablespoons of butter in the same pot over medium-high heat.  Add the onions and cook, stirring occasionally until translucent, 7 minutes.  Add the corn but reserve 1 cup of it for later.  Add the chicken stock, the thyme, and 2 cups water.  Simmer until the corn is very tender and the liquid is reduced by one quarter, 15 minutes. 

Remove the thyme stems from the soup, by now most of the leaves will have fallen off.  Puree the mixture with an immersion/stick blender until very smooth.  Add the cream, the reserved corn and the potatoes.  Season to taste with salt and pepper. 

Heat over medium high heat just until hot, 3 to 4 minutes.  Add the tomatoes and cook 6-8 more minutes.  Serve hot with toast and possibly a dry white wine.

Serves 6

Posted
Authordavid koch
CategoriesRecipes
Share

Ranger Pale Ale and Garden Vegetable Soup with Basil Pesto

Spring has come but things haven't quite warmed up yet.  We're still dealing with the 60'sand 70's here in LA and after a non-existent summer last year, I'm ready for some heat.  While we wait, this is a delightful spring soup that ties the seasons together.

This vegetarian soup can use either Great Northern or Cannellini beans to give it some girth and the blast of pesto adds a vibrant touch that ties it all together.  It may require some chopping and prep work but once that is done, assembly is easy and you can scale the recipe up to feed Napoleon's army of keep some for another rainy day in the freezer.

We were approached by Foodbuzz's Tastemaker program to come up with something that pairs well with the beers from New Belgium Brewing Company. We jumped on the idea - New Belgium is one of our favorites and on any given day, you'll have a good chance of finding one of their Folly Packs (a variety of different brews) in our fridge.


Garden Vegetable Soup with Basil Pesto

Soup:
  • 2 tablespoons olive oil
  • 1 yellow onion, chopped
  • 3 medium carrots, sliced
  • 3 celery stalks, chopped
  • 3 garlic cloves, minced
  • 2 fennel bulbs, chopped
  • 2 zucchini, chopped
  • 1 red bell pepper, chopped
  • 5 medium tomatoes (or 2 cans chopped tomatoes), peeled and chopped
  • 2 quarts vegetable stock (homemade or store bought)
  • 2 cups cooked cannellini beans (fresh or canned)
  • salt and pepper, to taste

Basil Pesto Garnish:
  • 2 cups fresh basil leaves
  • 2 cloves garlic
  • 1/4 cup pine nuts, toasted
  • 1/4 cup parmesan cheese, grated
  • 1/2 cup-3/4 cup extra virgin olive oil
  • salt and pepper, to taste

Instructions:

In a large stockpot, heat olive oil over medium heat and sauté onions, carrots and celery seasoned with a little salt and pepper for 2-3 minutes. Add in garlic, fennel, zucchini and red bell pepper and continue to sauté for an additional 3 minutes. Add in tomatoes and cook until tomatoes break down, about 3-5 minutes.
 
Pour in vegetable stock and bring up to a boil, turn down heat and let simmer until vegetables are almost cooked through, about 10-15 minutes. Add in beans and continue to simmer until beans are warmed through. Taste soup for seasonings and add additional salt and pepper as necessary. Ladle warm soup into bowls and garnish with a tablespoon of basil pesto.

To make pesto: In a food processor or blender add basil, garlic, and pine nuts and pulse until finely chopped. With the motor running slowly pour in olive oil until everything is incorporated. Stir in parmesan cheese and taste for seasonings. Add in salt and pepper as necessary.
Posted
AuthorDave and Amy Koch
CategoriesDrinks, Recipes
4 CommentsPost a comment
Share

Black Witbier: A Homebrew Recipe

I've been homebrewing for about 16 years now and after tasting nearly everything on the shelf, I enjoy pushing the boundaries.  I don't see the joy in duplicating Guinness when you can buy it for a heck of a lot less work and likely cheaper than to make your own.  If the Reinheitsgebot was the Wicked Witch of the West, I'm a bucket of water.

A Witbier is a Belgian style that uses spices besides hops to flavor.  Coriander and bitter orange peel are standard but black pepper, grains of paradise, chamomile, vanilla, cinnamon, and ginger are sometimes (albeit rarely) added by brewers to add a little more depth.

Today we take a more-or-less common Witbier and add chocolate malt to it.  This gives it a dark color but also a smokiness and a little toasted earthiness.  I added a little more spices than usual to compensate for the added flavor of the dark malt.

Besides the normal bitter orange and coriander, I also added ginger.  I first tasted a Wit with ginger from Shmaltz Brewing Company's "Coney Island Albino Python."  It has a distinctive ginger bite, and although I wasn't going for that so much, it is an excellent beer.

Disclaimer:  I've been brewing for so long, I haven't read a recipe in a while.  If I make some what you may consider "errors," please leave them in the comments.  I have made, quite possibly, a ton of beer and this technique works. 

Black Witbier

  • 3 gallons of water
  • 5 pounds dried pale malt extract
  • 1 pound crushed chocolate malt
  • 1 packet of dry Belgian yeast
  • 2 ounces of Cascade hop pellets
  • 3 tablespoons bitter orange
  • 3 tablespoons Grains of Paradise
  • 2 tablespoons of powdered ginger
  • 5 pound bag of ice


Put all the chocolate malt into a brew bag.  Add it to your largest brew pot and fill with water, leaving 6 inches from the rim, bring the water to 140 and keep it there for 40 minutes, stirring continuously.  

Once that step is done, hold the bag over the pot and rinse the grains with fresh water to extract the most from them.  This is called the wort (pronounced wert).  Take 2 tablespoons of the wort and pout them into a bowl, when it has cooled completely, sprinkle your yeast on top (called pitching the yeast).

Add the 5 pounds of malt extract and 1 ounce of the hops and bring to a boil.  Keep it there for 45minutes.  Add 1/2 ounce of the hops, boil for another 15 minutes.  Kill the heat and add the remaining 1/2 ounc of the hops along with the spices.

Add the bag of ice to your clean and sanitized primary fermenter and dump the wort into it.  Once it has cooled to 80 degrees add the yeast/wort slurry.  Cap and wait 10 days.

Once primary fermentation is done, rack into a second bottling bucket and bottle.  Give the bottles another 2 weeks to carbonate at room temperature.  Once they are ready, chill and drink!

Posted
Authordavid koch
CategoriesDrinks, Recipes
5 CommentsPost a comment
Share

Bufalo Spam Musubi

Spam is the island sweetheart of Hawaii.  I would be willing to bet that the residents of Hawaii eat more Spam than the contiguous 48 combined.  One of the treats you can find at nearly every local market, gas station, and convenience store in Hawaii is Spam Musubi.

Musibi, I gather, comes from omusubi (also called onigiri) which is white rice shaped into oval or triangle shapes, packed with pickled and/or salty treats, and wrapped in nori (seaweed).  It is commonplace as a quick snack in Japan.

In Hawaii, they have amalgamated the wonderful snack food onigiri and their love of Spam into Spam Musubi and if you ever make it to the islands, get some.

On a recent trip out there (sorry, if you flew Hawiian Air in December, we had the 7 month old), we grabbed some rice, some nori, some mirin, a can of Spam, and we decided to make our own.  

In Spam Musubi we have already got salty, sweet, and fishy - the addition of one of may favorite hot sauces, Bufalo, rounded out the perfectly flavor storm by adding spicy and smoky.

Bufalo also adds a blast of color, bringing bright red to the porky pink, white of the rice and deep green of the nori.  The mild heat of the Bufalo lingers along with the umami of the nori after the punch of salt from the Spam has long but passed.

Spamburger!

Ingredients:

  • 1 cup of white rice
  • 2 cups of water
  • 1/2 cup of mirin
  • 1 can of Spam
  • 1 package of nori
  • 1 bottle of Bufalo hot sauce


Cook the rice as you would normally, bring the water to a boil, add the rice, bring back to a boil then turn down to a simmer.  Cook until soft, about 15 minutes.  

Dump the cooked rice into a large bowl and drizzle the mirin over the rice to incorporate it evenly.  Mix well using a wooden spoon or something similar.  Set asside and allow to cool.

Slice the Spam into 1/2 inch thick slices and fry in a pan until they develop come caramel color and a little crispness on both sides, about 4-7 minutes.  

With about 3 tablespoons of rice, form small balls of rice with your hands (don't measure, make them however large or small as you like).  Squirt several drops of Bufalo on the top of each patty of rice.

Place a slice of fried Spam on top of the rice, covering the Bufalo sauce.  Wrap each piece in nori, sealing the nori by wetting your fingers in a small bowl of water and spreading it on the inside of the niro.  Wet nori will stick to itself.

Dip them in extra Bufalo, recipe makes 12-15.

Enjoy hot or cold.  What you don't eat right away, wrap individually in plastic wrap and keep in the fridge for up to a week (who knows how old some of those are at the 7-11 on Kam Haighway in Kahaluu).

Posted
Authordavid koch
CategoriesRecipes
2 CommentsPost a comment
Share
Kale Chips with Truffle Salt
On a recent trip I was reading one of those celebrity magazines and came across an interview with Kristen Bell. They asked what her diet secret was and she proclaimed kale chips!  I am still trying to lose those final pregnancy pounds and I thought I would give it a shot.

As I searched around for recipes I noticed that almost every food blog has a post on kale chips. Apparently, I am way behind on this phenomenon. In a quest to add my own twist to this delectable green treat I added a dash of truffle salt. I found them delicious and could have eaten the whole batch that night.

The next day I wish I had since they did not keep well, even in a sealed Tupperware container. I learned my lesson though and will be sure to devour the next batch right out of the oven. They were very simple to make, give them a try whether you are on a diet or not!

Recipe
  • 1 bunch kale
  • 1-2 tablespoons olive oil
  • Pinch of truffle salt (approx. 1/8-1/4 teaspoon)
Bake that kale!
Preheat oven to 375 degrees.

Remove tough stems from kale, then wash leaves and dry well. If the leaves are large cut or tear into smaller pieces.

Lightly toss leaves with olive oil then place on a sheet pan in a single layer. Bake in oven until crisp, about 10-12 minutes. While kale chips are still warm sprinkle with truffle salt. Let cool slightly then enjoy!


Posted
AuthorAmy Koch
CategoriesRecipes
2 CommentsPost a comment
Share

Butcher's Ragu with Spaghetti

This could have easily been called Bacon Ragu, and maybe next version, I'll just kick it up a notch - bam bam bam - and call it just that.  Let me also preface this recipe with: I'm not a huge marinara fan, I'll grind it mind you, but it is usually an afterthought to what other delights are in the pasta; sausage, meatballs, mushrooms, etc.  

This Ragu, on the other hand, is an adult sauce.  Although there is a 1.5 pounds of meat in the recipe, it is so flavorful that it stretches and doesn't end up a gut bomb.  The recipe makes 8 servings so with just the two of us we got four meals out of it, and I savored it all the way through the very last bite.

This is an adaptation of Mario Batali's "Butcher's Ragu with Fusilli" in the October 2010 issue of Food and Wine (page 214).  It makes a rich and hearty pasta that develops into fantastic leftovers and would freeze well.  We paired this with a 2004 Vino Nobile di Montepulciano called Salcheto.  Amazing combination; any bold Italian red from Tuscany would work.

Here are some of our major modifications: The original recipe called for pancetta instead of bacon (which we didn't have), an additional 1/2 pound of ham (so we added another 1/4 pound of bacon), no herbs (so we added heaps of parsley), extra water (didn't have all night for it to reduce), no tomatoes (which we just didn't feel right about), and fusilli (but Chef Amy felt like having spaghetti instead).

Butcher's Ragu with Spaghetti (printable recipe)


  • 2 tablespoons olive oil
  • 1 medium carrot, cut into 1/4 inch dice
  • 1 rib celery, cut into 1/4 dice
  • 1/2 medium onion, finely diced
  • 3 cloves garlic, thinly sliced
  • 8 ounces of bacon, cut into 1/2 inch pieces
  • 1 pound of ground beef
  • 1 small can of tomato paste
  • 1 cup milk
  • 1 cup white wine
  • 1 glass white wine (for the Chef to drink)
  • 1 14.5 ounce can of diced tomatoes
  • 1/2 cup parsley, chopped fine (set aside some for garnish)
  • Salt & freshly ground black pepper
  • 1 1/2 pounds of spaghetti
  • freshly grated Parmesan cheese, for serving


In a large pot over medium heat, add the olive oil, carrots, celery, and onion along with a teaspoon each of salt and pepper and cook until soft, about 10 minutes.  Add the bacon and the ground beef and cook, breaking up the beef with a wooden spoon.  Cook until no pink remains, about 8 minutes.

Add the tomato paste, stirring well to fully combine, and cook until shiny and rust colored, about 10 minutes.  Add the parsley (reserve some for garnish), canned tomatoes, milk, and white wine - add another teaspoon each of salt and pepper, lower the heat to a simmer.  Allow this to reduce into a thick sauce, about 20-30 minutes.

Bring a large pot of salted water a boil and cook the spaghetti, stirring often, until al dente.  Drain and add to the sauce and stir well to cover the pasta.  Serve piping hot and garnish with a touch more of parsley and grated Parmesan cheese.

Serves 8

Posted
Authordavid koch
CategoriesRecipes
Share

Coconut Lime Drop Biscuits

Because of its melting point of 76 degrees F, Coconut Oil makes a great substitution for shortening.  This makes it solid at room temperature, but it melts in your mouth.  It gotten a bad rap in recent times but as the single best source of Lauric Acid (which is antioxidant, antibiotic, and antiviral), its day will come.

Who cares how good for you it is, I love the way it tastes.  I've been cooking with coconut oil for about two years now, and as a great sub for shortening, I thought it must make a damn-fine biscuit.  Low and behold, it does.

Since it leaves a hint of coconut flavor, I thought it would be wise to embrace that note rather than cover it up.  Its coconut flavor is mild; however, but by adding lime you enhance it as the sweet and sour play nicely between the two.  

I adapted this from Alton Brown's Southern Biscuits recipe (#1 Google result), subbing out the shortening, skipping the baking soda, using lime juice and milk instead of buttermilk, adding more salt, and halving the recipe.  It really isn't close, but I thought I'd give him credit anyway


Coconut Lime Biscuits (printable recipe)

  • 1 cup flour
  • 2 teaspoons baking powder
  • 1/2 teaspoon salt
  • 1 tablespoon butter
  • 1 tablespoon coconut oil
  • 1/2 cup milk
  • the juice of 1/2 a lime
  • the zest of 1/2 a lime

Preheat oven to 350 degrees F.

Add all the dry ingredients to a bowl: the flour, baking powder, salt, and zest.  Whisk briefly to combine.  Work into the flour mixture the butter and coconut oil with a fork or your fingers until only small pieces of fat remain.

Add the lime juice to the milk and stir.  Make a well in the flour/butter and add the milk.  Mix just until combined but no more.  The dough will be sticky and may not even pick up all the dry ingredients.  That's OK, you want to work the dough as little as possible.

Using two spoons, scoop with one and pack with the other.  Scrape the drops out onto a sheet pan and bake until GBnD (Golden Brown and Delicious) - about 15-20 minutes.

Makes about 15 biscuits

Posted
Authordavid koch
CategoriesBaking, Recipes
3 CommentsPost a comment
Share

Mexican Chocolate Oatmeal Cookies with Dried Cherries and Walnuts

Yes, I realize that the name of these cookies constitute their own paragraph; maybe their own zip code, but that's what they are and no one can take that away from them.  They are also delicious, pragmatic, and are great to eat while playing charades.

I stumbled upon the idea by the heuristic "kitchen sink" method.  If oatmeal cookies are made better with chocolate, then why wouldn't they be even better with cinnamon, vanilla, and coffee?  And once you have added all that, why stop there?

That's exactly where Chef Amy usually stops me, but something was in the air this time and she kept egging me on.  "We have dried cherries," she declared, "Why don't you add some of those?" So I did.  "What about nuts?  Aren't you going to add nuts?" Ergo the circle of life perpetuates.

One batch yields about 3 dozen 3 inch cookies.  You could swap the nuts out, or substitute them for another type.  You could also add chocolate chunks or chips.  If I get my druthers next time, I'll add just a hint of Cayenne pepper, maybe just a half teaspoon.

They are hearty enough to satisfy a sweet tooth with just one, or two, and they make a decent breakfast along side a cup of coffee.  Don't judge, they do have oatmeal in them...


Mexican Chocolate Oatmeal Cookies with Dried Cherries and Walnuts (printable recipe)

  • 3/4 cup butter (1 and 1/2 sticks) room temperature
  • 1/2 cup coconut oil (or add another 1/2 stick of butter if you don't have any)
  • 1 cup brown sugar
  • 1 1/2 cup white sugar
  • 2 teaspoons vanilla extract
  • 2 eggs
  • 1 1/2 cups flour
  • 1/2 cup cocoa powder
  • 1/2 teaspoon salt
  • 1 teaspoon baking soda
  • 3 teaspoons of instant coffee/espresso, or 3 shots (or 1/4 cup of the strongest coffee you can brew)
  • 2 teaspoons cinnamon
  • 3 cups oats
  • 2 cups dried cherries
  • 1/2 cup walnuts

Preheat the oven to 350F. Cream the butter, coconut oil, brown and white sugar well, this is easiest in a stand mixer.  Slowly add the vanilla, cinnamon, instant coffee, salt, and the eggs one at a time and allow them to incorporate well.

In a separate bowl add the flour, cocoa powder, and baking soda and whisk briefly to combine.  Turn the stand mixer to its lowest setting and SLOWLY add the flour mixture to the butter and sugar.  Slowly, unless you want to get antiqued.  

Once those are mixed, add the dried cherries and the nuts.  Dollop out onto a silicone or parchment-lined baking sheet and bake for 11-12 minutes.

Makes 3 dozen cookies

Posted
Authordavid koch
2 CommentsPost a comment
Share
Curried Cauliflower with Chickpeas
This is one of my go-to weeknight meals when I don’t have much time yet I want something nutritious without sacrificing flavor.  The cauliflower and chickpeas make this hearty enough for a stand alone vegetarian dish.  

It is a great choice to serve to any vegetarian dinner guests as they will be thrilled to get something besides pasta!  Great on plain basmati rice, but your taste buds are really in for a treat when it is served over our Coconut Saffron Basmati Rice. Enjoy!
 

Curried Cauliflower with Chickpeas (printable recipe)
  • 1 tablespoon butter
  • 1/2 medium yellow onion, thinly sliced
  • 2 cloves garlic, chopped
  • 3 teaspoon curry powder
  • 2 teaspoon garam masala
  • 2 teaspoon cumin
  • 1 teaspoon tumeric
  • 1/2 teaspoon salt
  • 12oz cauliflower, cut into florets
  • 14.5oz can diced tomatoes
  • 1 cup water
  • 15oz can chickpeas (garbanzo beans)
  • 1/4 cup cilantro, chopped - plus more for garnish
  • 2 tablespoons greek yogurt - plus more for garnish

Over medium heat, melt butter in a pot or deep saute pan and add onions. Cook slowly until onions are soft and translucent, about 3-4 minutes. Add garlic along with all the spices (curry powder, garam masala, cumin, tumeric, salt).

Saute for 1 minute, then toss in cauliflower and stir to coat in the spices. Add tomatoes, water, and chickpeas and let simmer until cauliflower is just cooked through, about 6-8 minutes. Turn off heat and fold in cilantro and yogurt. Serve immediately over rice and garnish with a little extra yogurt and cilantro.

Serves 3-4

Posted
AuthorAmy Koch
CategoriesRecipes
3 CommentsPost a comment
Share

Coconut Saffron Basmati Rice

Since we make a stir-fry or a curry at our house on a weekly basis, this has become a staple.  This Coconut Saffron Basmati Rice recipe takes white rice and elevates it to regal status.  I could eat a big bowl of this on its own.  I could rub this all over my face and go to sleep in it.  I could springboard forward 2 and 1/2 somersaults in the pike position into a swimming pool of this stuff.

It is amazing.  

Adding coconut oil gives it a little tropical touch, but a serious tropical - sans umbrella.  The saffron brings that floral nuance that basmati rice already has, but forgot to bring to the dance.  The last part is the Better than Bouillon; which I think is really better than bouillon.  Saltiness is what rice needs to keep it from going flat on you.

One trick is to add twice the saffron the cheapskate side of your brain tells you to add.  Yes, saffron is the most expensive spice in the world.  Yes, at $1,000 per pound, it is ridiculously more expensive than anything else.  Yes, it takes between 50,000 and 75,000 dried flowers to produce only one pound of saffron.  Yes, a little bit goes a long way.

My cheapskate brain has told me all of these things but the rational thought that comes next should be, "If I bought this little jar of saffron in 1988, why is it still here?"  And that's the key.  How old is your saffron?  Was it picked sometime during the Carter Administration?  Get over it.  Dump it in some rice and buy some more.

The next trick is the coconut oil.  Stir it in at the end, to fluff the rice, and not in the beginning.  This is so that you don't cook the turquoise lagoon and white sand beach out of it.  You want the pure essence of the coconut to remain.  You may be pleasantly surprised how light coconut oil is, it is much lighter than olive oil or butter.

The last secret is Better than Bouillon.  This adds a complex saltiness that lends more body and richness than stock.  It can also sit in the fridge for eons.  Along with the rice, the saffron, and the coconut oil, these can be kept for a long time ready to be formed like Voltron when needed.


Coconut Saffron Basmati Rice 

  • 1 cup Basmati rice, rinced well
  • 2 cups water
  • 1 tablespoon of Better than Bouillon
  • 1 large pinch of saffron, don't be a Grinch
  • 1 tablespoon of coconut oil


Add the saffron and the Better than Bouillon to the water in a small pot, covered, and bring to a boil.  Add the rice, which will cool the water, bring back to a boil, then reduce to a simmer.  Cook until the water has evaporated and the rice is cooked, about 15 minutes.  Kill the heat and stir in the coconut oil with a fork, fluffing the rice as well.  Serve hot with a shovel.

Serves 2


In case you didn't know what Voltron was...

Posted
Authordavid koch
CategoriesHumor, Recipes
3 CommentsPost a comment
Share
Lactose-free Panna Cotta with Strawberries and a Cinnamon Graham Crackers Crust

It is estimated by the American Dietetic Association that approximately 75% of the world's population is at least partially lactose intolerant.  Thus, 75% of the world's population must also be Panna Cotta intolerant.  What a drag.

That's why we jumped at Lactaid's Gourmoo Cookoff and decided to show everyone that, "You too can eat Panna Cotta without gastrointestinal discomfort!"  We made lactose-free Panna Cotta with Strawberries and a Graham Cracker Crust.  This is a really easy recipe, the only skill it requires is patience.


Lactaid Gourmoo Panna Cotta


Lactose-free Panna Cotta with Strawberries and a Cinnamon Graham Crackers Crust (printable recipe)
  • 4 cups Lactaid whole milk (or Lactaid half-and-half)
  • 1/2 cup sugar
  • 2 teaspoons of vanilla extract
  • 2 packets powdered gelatin
  • 4 Cinnamon Graham crackers
  • 2 tablespoons melted butter
  • 1/2 pound of strawberries
  • 1/4 cup sugar
Prepare everything at least 2 hours ahead, that will allow time for your Panna Cotta to set up and your strawberries to macerate.  We are using 2 types of bowls, one slightly larger than the other so that when we un-mold them there is room for the strawberries.

Our recipe calls for four cups of Lactaid, we’re using whole milk but you could also use the Lactaid half-and-half.  2 packs of gelatin, 1/2 cup of sugar, and 2 teaspoons of vanilla extract.

Measure the Lactaid and add it to a saucepan but reserve a little bit in the measuring cup and sprinkle the gelatin over it.  Heat the Lactaid in the saucepan and add the sugar so that it dissolves completely.

Kill the heat, add the vanilla extract, and pour into the measuring cup.  Whisk to combine.  Pour them off into your bowls and place them into the fridge to chill and set up.  If you are letting them set up over night, cover with plastic wrap.

Process 4 cinnamon graham crackers in a food processor while melting 2 tablespoons of butter in a mug in the microwave.  When the butter is melted, add it to the crackers in the food processor and pulse a few times to incorporate well.  Pat the mixture at the bottom of your serving bowls.

Slice your strawberries and add 1/4 cup of sugar, mix well and allow them to sit and macerate while the Panna Cotta sets.

Once the Panna Cotta is set (at least 2 hours, but up to 24), run a knife along the inside edge of the bowl to separate it and invert it over your serving bowl to un-mold.  Scoop copious amounts of strawberries and serve.

Serves 4

As a promotion with the Foodbuzz Tastemakers Program, we received a thing of Lactaid milk. 


Posted
Authordavid koch
Share

Grown-up French Toast with Strawberries in a Honey Balsamic Reduction

I'm a huge fan of French Toast but while sometimes I like to slather on the butter and drench it in maple syrup, sometimes I want something more refined, something more grown-up.  We sought to incorporate a range of flavors besides just sweet - because French Toast at your local diner can be so cloying.  

While the French Toast aspect of this recipe is pretty standard, maybe a little extra salt than usual, maybe a finer grade of cinnamon, and using a nice, hearty whole wheat from Nature's Pride; it is the toppings that make these golden brown slices pop.

We begin with a balsamic and honey reduction with which we toss over fresh strawberries and allow them to macerate.  This lets the strawberries soften a bit and in return they give off a lot of their juices, thus making our "syrup."

We toasted up some slivered almonds to give some crunch, because in my opinion, texture is a big miss with your average soggy French Toast.  Lastly, we added some uber-thick Greek-style yogurt for some richness, color contrast, and adding another component to customize each bite.

What we came up with takes a little bit more time but the result is something that the adults can enjoy as much as the kids, and they can feel better that the little "nose-miners" are getting something with much nutritional value than usual.

Grown-up French Toast with Strawberries in a Honey Balsamic Reduction (printable recipe)

  • 1/4 cup balsamic vinegar
  • 1/4 cup honey
  • 1/2 pound strawberries, sliced thin
  • 8 slices of whole wheat bread, we used Nature's Pride 100% Whole Wheat
  • 6 eggs
  • 1/3 cup milk
  • 1/4 teaspoon Saigon cinnamon
  • 1/4 teaspoon
  • 1/2 teaspoon vanilla extract
  • 2 tablespoons of butter.
  • 1/2 cup slivered almonds, toasted
  • 1 cup of Greek-style yogurt

Add the vinegar and the honey to a pot over medium heat and reduce by about a half or until you see that the bubbles start to thicken.  Pour the reduction over the strawberries, you should have to use a spatula to get it out because it is so thick.  Toss well over the strawberries and set aside.

Add the eggs, salt, cinnamon, vanilla, and milk to a large flat-bottomed container - one that is wide enough to dip your bread into.  Whip these together so that everything is incorporated well.

Dip the bread in the egg mixture on both sides so that it soaks up the batter.  Using a non-stick pan, bring it to medium heat with a little butter just until the butter foams.  Add the battered bread ad cook on both sides until they are golden brown.

Top 2 slices with a few tablespoons of the strawberries along with some of the juice they gave off, a dollop of the yogurt, and a sprinkle of the toasted slivered almonds.  Serve piping hot. 

Serves 4


This was part of a promotion with the Foodbuzz Tastemaker Program, I received a loaf of Nature's Pride bread.

Posted
Authordavid koch
CategoriesRecipes
2 CommentsPost a comment
Share
Chicken Sausage and Spinach Risotto

The thing I love about risotto is that it is a blank slate in which you can add a wide array of flavors. You can just let your imagination run wild!  I love the flavor combination of sausage, peppers, and dark greens so came up with this easy recipe.

I wanted my risotto on the lighter side so I used chicken sausage, but you could use pork if that is what you prefer.  Also, don’t limit yourself to just spinach since any dark green would be great in this!  Use whatever is fresh and in season.  Enjoy!

Chicken Sausage and Spinach Risotto (printable recipe)
  • 1 tablespoon butter
  • 1 tablespoon olive oil
  • 4-5 cups chicken stock
  • 1 yellow onion, diced
  • 10 ounces of sweet Italian chicken sausage, casings removed
  • 1 red bell pepper, diced
  • 12 ounces arborio rice
  • 1/2 cup dry white wine
  • 1 tablespoon tomato paste
  • 3 ounces baby spinach
  • 1/3 cup basil, chiffonade
  • 1/4 cup grated Parmesan cheese, plus additional for garnish
  • Salt and pepper

In a small saucepan heat chicken stock and keep warm.

In a stockpot, heat butter and olive oil on medium heat. Add onion and saute until translucent, about 3-5 minutes. Add in sausage and break up meat with a large spoon until crumbly and cooked through. Add in bell pepper and arborio and saute until the rice is coated with fat and slightly toasted, about 3 minutes.

Pour in white wine and bring to a simmer. Let wine reduce completely, while scraping up any sausage that is stuck on the bottom of the pan. Stir in tomato paste then ladle in warm stock so it just covers rice. Stir and let simmer. As stock reduces, keep adding liquid, about 1 cup at a time, and continue stirring.

Once rice is almost cooked through, about 10-15 minutes, fold in spinach. After the spinach has wilted and the rice is completely cooked, stir in basil and Parmesan cheese. Taste and add salt and pepper as necessary. Ladle risotto into bowls, garnish with a little more Parmesan cheese and serve immediately.

Serves 2-4


Posted
AuthorAmy Koch
CategoriesRecipes
Share

Mocha Fillet Mignon with Saffron Rice

We purchased a case of Clone 6 Cabernet Sauvignon from the Wine Garage some time ago and I was itching to open one and reap the rewards of my patience.  Knowing that Cabs, especially young ones, can have a high astringency from their tannins I began to think of ways I could doctor a steak to make it pair even better with these purple gromets.

Cabs often have notes of black pepper, smoke, dark chocolate, and coffee (along with their fruit) so I decided on a mocha dry rub and to fire the steaks on the grill as opposed to a pan-sear and finishing them in the oven.  I knew that the key was not to make the mocha obvious; the success would be in its subtlety.

If you couldn’t tell already, this blog is not our only job, and one of the guilty time-savers we have been implementing in our diets has been instant rice.  I know, I know, their texture is way off but when you make instant brown rice instead of white it keeps the yin and the yang of the universe at balance, right?

Maybe not completely in balance, but if you add enough butter and saffron to instant brown rice the result is pretty darn good.  That’s our little “pearl” for the week.  Tell a friend.

Mocha Fillet Mignon with Saffron Rice (printable recipe)

The dry rub for each steak:
  • 1/2 teaspoon cocoa powder
  • 1/2 teaspoon finely ground coffee
  • 1/4 teaspoon salt
  • 1/4 teaspoon cracked black pepper

Rub down each steak very well, working it into all the nooks and crannies (if steaks have nooks and crannies, find them, and rub the mocha into them).  Allow them to sit for at least 15 minutes to come to room temperature, but no longer than 30.

Cook the instant brown rice according to the directions on the box (they usually come in a box, with directions on them); however, add 50% more butter then called for, a pinch of salt, and a pinch of saffron.  Unfortunately, you’ll still know it was instant but it will at least taste good.

Grill the steaks until they are to your desired done-ness.  Pair with a Cabernet Sauvignon or another bold red with a backbone of tannins like a Merlot or a Syrah.  

Serve the steaks with the saffron rice and a side salad.  Since the wine and the dry rub have a lot of bitter in them, add a little honey or even a pinch of sugar to your salad dressing.  The sweet will be a counter-point to the bold flavors of the steaks and help balance your palate.
As a final touch, we added some of Olivia's Garlic and Herb Croutons to the salad.  They are buttery and delicious and have a great crunch to them.  They sent us some as a promotional gift and we are thankful for them, they are wonderful.

Enjoy!


Posted
Authordavid koch
CategoriesRecipes
2 CommentsPost a comment
Share
Green Goddess Dressing
Tip - make your Green Goddess Dressing ahead - it should sit in the fridge for at least 3 hours.  I have a tendency NOT to read recipes before jumping in... this one only sat in the fridge for an hour and was a little mild, the flavor develops with time.
 
I got this from Bon Appetit Magazine in my favorite feature, "Molly Wizenberg's Cooking Life."  Everything she writes about sounds delicious. This was from their May 2009 issue.  My husband Steve and I love the bottled goddess dressings but she says they are no comparison to the real deal.

  1. 1/2 ripe medium avocado (about 7 ounces)
  2. 3 tablespoons white wine vinegar
  3. 1 garlic clove, finely chopped
  4. 1 oil-packed anchovy, very finely chopped
  5. 1 teaspoon fresh lemon juice
  6. 1/2 teaspoon fresh lime juice
  7. 1/4 teaspoon sugar
  8. 3/4 cup olive oil
  9. 1/4 cup heavy whipping cream
  10. 3 tablespoons chopped fresh Italian parsley
  11. 2 tablespoons chopped fresh tarragon
  12. 2 tablespoons chopped fresh cilantro
  13. 1 tablespoon chopped fresh basil
  14. 1 small shallot, finely chopped (about 1 tablespoon)
 

Blend first 7 ingredients in processor until coarse puree forms.  With machine running, gradually add oil through feed tube; blend well.  Transfer mixture to bowl; whisk in cream.  Add parsley, tarragon, cilantro, basil, and shallot; whisk to combine.  

Season dressing to taste with salt and pepper.  Cover and chill at least 3 hours (dressing will separate if not chilled).  Let stand at room temperature 20 minutes and re-whisk before serving.

Can be made 1 day ahead.  Keep chilled.
Posted
AuthorHeather Ward
CategoriesRecipes
Share

Grilled Corn and Zucchini Salad

This is ultimate summer salad; fresh, seasonal vegetables combined with the BBQ.  I came up with this salad while at my local farmer’s market where I bought all the produce for this great dish.

We served the salad along with some grilled BBQ chicken breasts but it would also go great with any grilled fish or steak. Stop by your local farmer’s market, invite some friends over, fire up the grill and give this salad a try this weekend!


Grilled Corn and Zucchini Salad (printable recipe)

  • 3 ears of corn, shucked
  • 2 zucchini, halved lengthwise
  • 3 scallions, thinly sliced
  • 1 cup cherry tomatoes, halved
  • 1/3 cup fresh basil, chiffonade
  • 1/4 cup of olive oil plus one tablespoon
  • Juice of 1 lemon, divided
  • 3 ounces of feta cheese
  • Salt & pepper


Preheat grill.

In a small bowl, combine 1/4 cup olive oil and half the lemon juice. Using a pastry brush, apply lemon oil all over zucchini and corn then sprinkle liberally with salt and pepper.

Once grill is ready, add the zucchini and corn, turning as necessary until vegetables have grill marks and are cooked through. Remove and let cool. Once they are easy to handle, cut kernals off the cob and cut zucchini into 1 inch chunks.

Place in bowl, then add scallions, cherry tomatoes, basil, feta cheese, juice from the other 1/2 a lemon, and 1 tablespoon of olive oil.  Taste salad and add salt and pepper as necessary.

We also grilled some chicken breast with the same marinade, sliced thin, and topped with Country Bob's Spicy BBQ Sauce.  It is sweet, tangy, and just the right amount of heat.  Enjoy!


Serves 4


Country Bob's Spicy All Purpose was sent to us as a promotional gift.

Posted
AuthorAmy Koch
CategoriesRecipes
Share

Tzatziki Guacamole

Take the creamy coolness of guacamole and combine it with the refreshing crisp crunch of cucumbers, zip of yogurt, and zest of lemon; assemble them and they form like Voltron into quite possibly the greatest dip ever.

Not to toot my own horn [beep beep] but this is really good - and since the cucumber lightens things up, you don't feel nearly as bloated or guilty when you devour and entire bowl with a half a large bag of tortilla chips to the dome.

This didn't last long enough to top a dish but I could see it being great on chicken or lamb.  It is of course excellent with chips, especially tortilla chips, eating it with a spoon, or your fingers; just don't dip past the second knuckle because that's rude.

Tzatziki Guacamole (printable recipe)

  • 2 ripe avocados, cubed
  • 1/4 red onion, minced fine
  • The juice of 1 lemon, the zest of half of it
  • 1 large ripe tomato, diced
  • 1 cup of yogurt
  • 1/2 a large cucumber, seeded and diced small
  • 1 tablespoon salt
  • 1 teaspoon pepper
  • 1 tablespoon finely minced cilantro


Combine everything into a large bowl. Try not to eat it all before you blink. If you have anywillpower, it can be stored up to a day in the fridge if you cover the surface with plastic wrap.  


Posted
Authordavid koch
CategoriesRecipes
Share
Caprese GazpachoOnce again our house was full of beautiful tomatoes.  With the warm summer temperatures lately, I wanted to get away from the stove for the evening but still do something fulfilling with all our fresh vegetables.  
 
I instantly thought of gazpacho, a cold raw vegetable soup from Spain.  I also had all the ingredients on hand to make my favorite salad, Insalata Caprese, made simply with buffalo mozzarella, tomatoes, and basil.
 
Finally, I realized I could merge the two into one great dish and enjoy all the wonderful flavors from Spain and Italy in one bite.  This recipe would be wonderful served for lunch or as a light supper.  It looks beautiful plated up and would surely impress dinner guests as a first course.  Enjoy!


The Gazpacho Line-up
Caprese Gazpacho (printable recipe)
  • 4 medium-sized tomatoes (about 2 lbs), coarsely chopped - reserve 1 cup of the tomatoes, 1/4 inch dice
  • 1 cucumber, peeled, seeded, and coarsely chopped - reserve 1/4 cup of the cucumber, 1/4 inch dice
  • 1 yellow onion, coarsely chopped - reserve 1/4 of the onion and dice fine
  • 1/2 cup fresh basil, torn into pieces - reserve 1 tablespoon chiffonade
  • 1 bell pepper (any color you have on hand), coarsely chopped
  • 1 jalapeno, seeds removed then coarsely chopped
  • 3 cloves garlic, peeled and smashed
  • 3 ounces fresh mozzarella, 1/4 inch dice
  • 2 slices of bread, crust removed and coarsely chopped
  • 1/3 cup olive oil, plus more for garnish
  • 2 tablespoons red wine vinegar
  • Juice from 1/2 a lemon
  • Salt and pepper

Caprese Salsa
In a bowl combine, reserved tomato, cucumber, onion, and basil. Fold in mozzarella then season with salt and pepper. Cover and set aside in refrigerator to stay cool.

Gazpacho
In a large bowl, combine the remaining tomatoes, cucumber, onion, basil, bell pepper, jalapeno, garlic, and bread. Working in batches, puree ingredients in a blender while slowly pouring in the olive oil, until it is a smooth consistency.

With a spatula push soup through a fine mesh strainer into a large serving bowl. Stir in red wine vinegar, lemon juice and season with salt and pepper. Cover soup and let chill in the refrigerator until ready to serve.


To serve, ladle soup into individual bowls and garnish with caprese salsa and a drizzle of olive oil.

Serves 4


The Gazpacho-maker

Posted
AuthorAmy Koch
CategoriesRecipes
Share