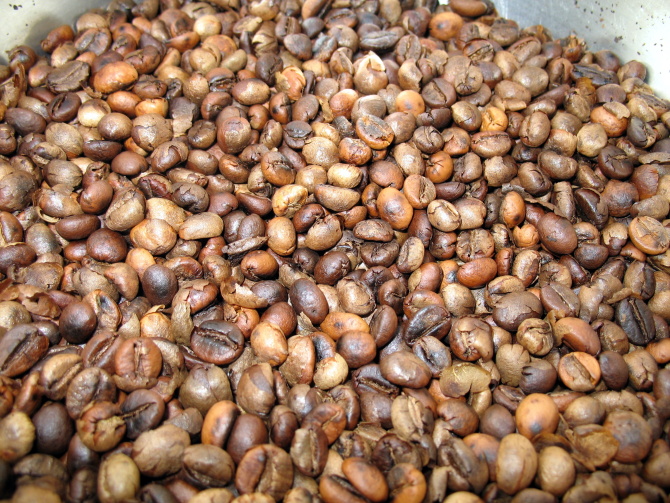
Roast Your Own! I've been reading much of the database of coffee knowledge accumulated at Sweet Maria's Roasting Supplies and came to the conclusion, "I can do that!" Sometimes these are famous last words, sometimes these are life-changing epiphanies. I hope that in this case they are the latter.
I picked up two pounds of "green" (unroasted) beans; one pound of the Guatemala Finca La Bella JBM (Jamaican Blue Mountain) Cultivar, and one pound of the India Robusta Jeelan Estate Nirali.
The first type was upon their recommendation for a novice roaster, the second...
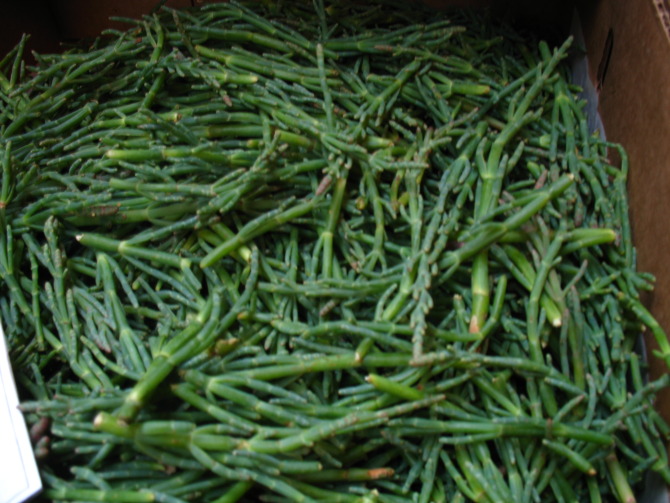
What are these little green sprigs? Sea Beans? A Sea Bean is the salty, succulent plant called Salicornia that is also sometimes called glasswort, pickleweed, and marsh samphire (I grew up calling Carpobrotus edulis "Ice Plant" pickleweed, but then again, my parents are no Botanists.) True Sea Beans appear during the summer at farmer's markets and specialty food shops for a few weeks and they only last a few days once picked, so eat them as soon as you buy them.
Sea beans have great crunch that bursts a blast of brine when chewed. They taste just like a day at the beach - really, their resemblance to the sea is uncanny. Because they are so salty,
I was at a friend's house for dinner and we were planning to make some stuffed figs as an appetizer... but upon returning from the store we realized we had forgot to buy the figs. We looked around the kitchen to see what else we could use. There were some perfectly ripe peaches in my friend's fruit bowl which I thought would compliment the saltiness of the prosciutto perfectly...
What a perfect summer salad. The sweetness of the watermelon, the meatiness of the tomato, the salty feta cheese and the crisp, herbaceous mint all meld together like people dancing at a reggae concert. Each bite has a different character, unique and delicious...
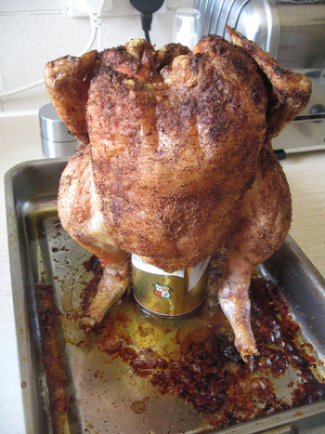
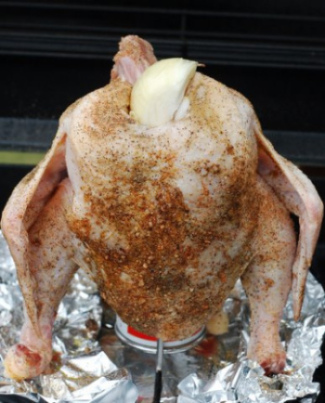
AhhBeer Can Chicken, a staple food growing up and always a go-to grill option for my father. The logic is sound, prop up the bird so that the breast meat is not scorched by the direct heat of the grill and thus dried out. The beer gently steams the cavity adding a subtle nuance of malted barley and hops; the liquid also adding to the moisture of the meat. Brilliant.
But wait. Is there a plastic liner in my beer can? What's this about Bisphenol-A (BPA)? Is BPA going to kill me? What about the paint on the outside? Is it true that Aluminum is linked to Alzheimer's Disease? Oh my gosh, is my Beer Can Chicken going to kill me?
This debate sprung up recently and I decided to check the facts. Note: I'm not a doctor but I had a cameo as one in a school play. Let's begin:
Is there a plastic liner in my beer can? - Most likely. Beer and soda are reactive to metals and would taste horrible out of a can without a liner of sorts. There is a wonderful article on the History of the Beverage Can by the Museum of Beverage Containers and Advertising that states that lined cans hit the market in 1935 - and the industry, basically, never looked back.
This is an image of the plastic liner inside a beverage can that has had the aluminum exposed by dissolving it in acid (photo courtesy of Steve Spangler Science):
What is all this news about BPA? - BPA is a building block of many everyday plastics. Researchers have correlated exposure to BPA to heart disease, diabetes and possibly cancer. Consumer awareness about BPA hit an all time high last April when news detailed baby bottles that contain BPA and Nalgene quickly removed its water bottles from shelves.
Is BPA going to kill me? - Maybe. Not from drinking beer it appears [thank god] but a recent study by the Center for Disease Control fount BPA to be present in 93% of the population in the U.S. That's how everyday this stuff is.
In 1995, the Society of the Plastics Industry, ran a study to quantify the migration of BPA from can coatings. They determined that an average adult consumer would have to consume "about 500 pounds of canned food and beverages every day for an entire lifetime to exceed the safe level of BPA set by the U.S. Environmental Protection Agency (EPA)."
Before you sigh a breath of relief, there are some mitigating factors here... Do you trust that the EPA has correctly determined what safe exposures to BPA are? Do you trust the results of a BPA study conducted by the Society of the Plastic Industry? Why hasn't anyone studied the exposure generated by grilling a can of beer that's been stuffed in achicken's rear end?
What about the paint on the outside? - Hmm, I've got nothing for ya - except Little Jimmy used to eat paint chips and we all know how he turned out...
Is it true that Aluminum is linked to Alzheimer's Disease? - "They" don't think so. The link between Aluminum and Alzheimer's was first put forward in 1965 and aluminum has been shown to be present in both plaques and tangles in the brains of people with Alzheimer's disease. I know people who avoid antiperspirant because they contain aluminum-based compounds.
According to the Alzheimer's Society; however, "The overwhelming medical and scientific opinion is that the findings outlined above do not convincingly demonstrate a causal relationship between aluminum and Alzheimer's disease, and that no useful medical or public health recommendations can be made− at least at present (Massey and Taylor 1989)."
Oh my gosh, is my Beer Can Chicken going to kill me? - I am completely unqualified to answer this, but... I don't think so. For what it's worth, this is my logic: As long as beer is still inside the can, the temperature won't reach much more than 212 degrees F, the boiling point of water.
The boiling point of BPA is about 428 degrees F, so whatever BPA there might be inside the can liner, likely won't cook into the food. If it does, it will stay mostly inside the cavity of the bird and considering how unappetising chicken ribs are, no one is likely going to be eating them.
The paint on the outside follows the same rules as far as I'm concerned. Ensure there is enough liquid in the can and the paint probably won't bake off either.
As far as the aluminum goes, just think about how much plastic and paint there is on that can protecting you from that nasty aluminum...
There is a great debate on Beer Can Chicken going on in the Chowhound forums, here is my favorite comment so far:
I think to many people are a little to panicky about these simple heath issues. You never heard anyone say anything back in the day when we all as kids drank from the garden hose. How about putting marshmallows on a tree branch to roast them? Maybe an insect deficated [sic] on that branch, or maybe it was sprayed with mesquito [sic] spray, who knows? - Jimbosox04
Lastly, if you want to see how beverage cans are manufactured, thank How it's Made by the Discovery Channel for making this video.
I first heard of Almond Soup on Evan Kleinman's radio show/podcast Good Food. She and her guest talked about Ajo Blanco - a kind of gazpacho from southern Spain. I thought, "cool, I was wondering what I was going to do with all those raw almonds that I just I bought..."
I dug around a little bit online to find a recipe; searching "spanish almond soup" I found a theme, grasped some basic ratios, and set out on making it my soup, albiet not Ajo Blanco. Garlic, saffron, and bread or bread crumbs were present in all of them. Besides those, some had cumin, some had milk, some had vinegar, some even had cinnamon.
In full disclosure and truthiness, three of the recipes I found were completely identical: the one from costadelsol-vacationrentals.com, from ezinearticles.com, and also eatmoreherbs.com. They all started with, "Heat the oil and toast the almonds, garlic, bread and saffron. When golden brown set a few..." and completed the recipe verbatim. I wonder who got screwed.
In any case, this is what I came up with. The key is blending the Jiminy Cricket out of it and running it through a strainer. The yield is less but the result is not nearly as grainy. Almonds don't break down under heat like, say, peanuts or other legumes will.
Ingredients:
2 tablespoons olive oil
1 cup almonds
2 cloves garlic
1 pinch of saffron
1 cup fresh flat-leaved parsley, chopped
2 tablespoons of breadcrumbs
1 teaspoon of cumin
8 cups of chicken or vegetable stock
the juice of 1 lemon
Technique:
Heat the almonds and garlic over medium-high heat with the olive oil for about 3-4 minutes, just until the garlic develops a little color and the almonds become fragrant. In another pot, bring the 6 cups of stock to a simmer.
Add the saffron, cumin, and breadcrumbs to the almond mixture and begin to stir them well. This will bloom the flavor of the cumin and saffron and cook any raw flavor out of the breadcrumbs - about another minute.
Add 2 cups of the stock to the pan to deglaze, bring back to a simmer, then transfer the mixture to a blender. Add the chopped parsley, salt, and pepper. Blend thoroughly, 2-3 minutes.
Pour the blended almond mixture through a strainer into the simmering stock. Add the lemon juice, check the seasoning and serve hot.
You can garnish with slivered almonds, and a pinch of the parsley.
Notes:
I used raw, unsalted almonds. I'm sure you can use roasted and/or salted you simply would not need to cook them as long, and adjust the salt accordingly. I would also not recommend an emersion blender, they wouldn't be able to break down whole almonds like a good 'ole stand blender can.
How about a fancy-pants twist on a summer favorite? OK, it's not THAT fancy, but it isn't much more difficult than making a normal mojito and it adds a nice little kick. Yes, you could just add more rum if you want a kick... so why not add more rum and the ginger too?
Obviously only fresh mint and ginger will do. Unfortunately, ginger comes in pesky little shapes and can be difficult to remove the skin. If you peel it with a spoon you can eliminate the risk of slicing your finger.
Garnish these little firecrackers with a lime wedge or a slice of ginger. Make a slit with a sharp knife and hang it from the rim.
Make a mojito as you normally would:
a small bunch of fresh mint leaves, about 6-7
half a lime, cut into 4 wedges
1-2 teaspoons of sugar
3-4 sugar cube-sized chunks of fresh ginger
1.5-2 ounces white or light rum
ice
top everything off with soda/seltzer water
Directions:
Put the mint, lime, sugar, and ginger into a tumbler. Muddle everything together with a... muddler! (seriously, you can't make a proper mojito without one).
Add the rum, ice, and top the glass with seltzer water. I like to munch the mint as I go, it freshens your breath; and besides, spitting the little bits back into your glass every time you take a sip is uncouth.
Done.
Here is a great video from Epicurious on how to make a "proper" Mojito; a la one that you would find in a nice bar.
Like Mike Tyson, Mint and Curry join together in this summer blockbuster to knock your taste buds out. This chicken salad takes only 15 minutes to prepare if you use one of those pre-roasted chickens from the grocery store... and who wouldn't. We put it on a toasted croissant with some field greens and the results were scrumptious.
This would also rock on brioche, on wheat toast, or in a wrap. I will eat it in a box. And I will eat it with a fox. And I will eat it in a house. And I will eat it with a mouse. And I will eat it here and there. Say! I will eat it ANYWHERE!
Ingredients:
1 roasted chicken, sans drumsticks (eat those while you're making everything else)
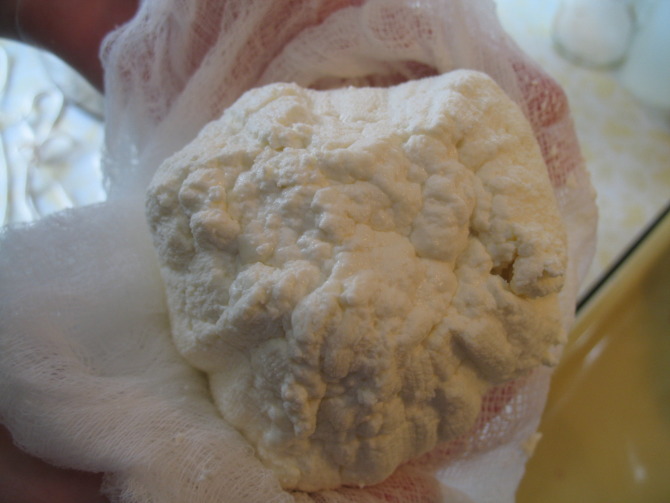
Making homemade ricotta is incredibly easy, relatively quick (30-45 minutes), and requires literally no skill whatsoever. It is, on the other hand, a huge crowd pleaser - and if you tell everyone, "it is quite a process," you can impress them with your dark knowledge of the culinary witchcraft called cheesemaking.
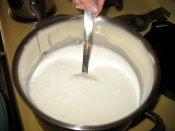
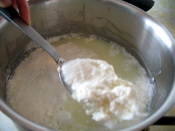
Begin with a half gallon of whole milk and a half-quart of buttermilk in a large cold pot. Turn heat up to high and constantly stir with a heat-proof rubber spatula or wooden spoon. While stirring, be sure to continually scrape the bottom of the pan so that the milk does not scorch.
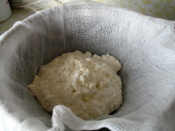
When the milk/buttermilk mixture comes to about 180 degrees F, curds will begin to form on the surface. At this point, stop stirring for one minute to allow them to separate from the whey. Remove from heat.
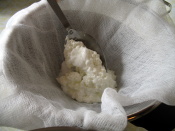
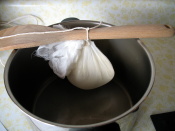
Line a sieve with cheesecloth and gently scoop curds into the cloth to allow to drain. Do not push down or squeeze. One method to allow the ricotta to drain is to tie the cheesecloth into a bundle and then to a wooden spoon suspended over a pot (see below).
Drain for 15-30 minutes. Gently remove ricotta from cloth and salt to taste.
One simple and delicious appetizer to make with your homemade ricotta is to add fresh herbs like rosemary, thyme, parsley, chives, and/or lemon zest. Place it in a bowl and next to a plate of crostini (that's a fancy name for toast) so that you can spread it on yourself.
Get the kids involved and show them that cooking can be magic, making a solid cheese from liquid milk.
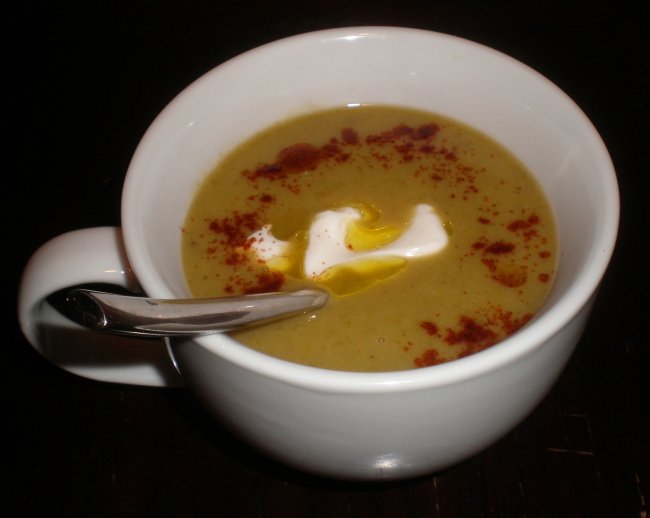
This Creamy Collard Greens and Roasted Garlic Soup is a hearty soup with the addition of potatoes and cream. It takes about an hour and requires only an emersion blender, an oven, and a stove. It makes for a completely satisfying entrée with a little bread or toast as a side. I garnished it here with a dollop of sour cream, a drizzle of olive oil, and a dusting of paprika.
Ingredients:
1 pound of medium-starch potatoes, like Red or Yukon Gold, roughly chopped
1 pound of carrots, roughly chopped
1 pound of collard greens, washed well, and roughly chopped
1/2 pound of asparagus
1/2 onion, roughly chopped
1 quart of chicken or vegetable stock
1 bulb of garlic, roasted
1 cup cream
Salt & pepper to taste
Directions:
Pre-heat the oven to 350. Slice bulb of garlic in half into a cross-section, rub with olive oil, salt & pepper, and place into the hot oven for about 30 minutes until it browns lightly. While that is roasting, wash and chop all your vegetables. Ensure the greens get a good soak, they tend to have a lot of grit on them when you get them from the store.
Bring a large pot to medium-high heat, add 1 tablespoon of olive oil, the carrots, asparagus, and onions, salt & pepper, and sauté for 2-3 minutes. Then add the stock and potatoes, bring to a boil, then turn the temperature down to a simmer and cover. Cook until the potatoes until they're soft and yield easily to being pricked with a knife, about 15-20 minutes.
Once you have removed the roasted garlic from the oven, squeeze it so that the cloves slide out. They should have the consistency of pudding at this point and should slide out easily. Drop them into the pot along with the collard greens and bring back to a boil, hold them at a boil for 5 minutes.
Once the greens have had time to soften, take the pot off the heat and blend thoroughly with an emersion/stick blender, or in batches in a traditional blender. Once everything is blended, taste to see if you need more salt & pepper, and add the cream. Mix well.
Serve hot and garnish with sour cream and/or a little olive oil, and a sprinkle of paprika. Enjoy.
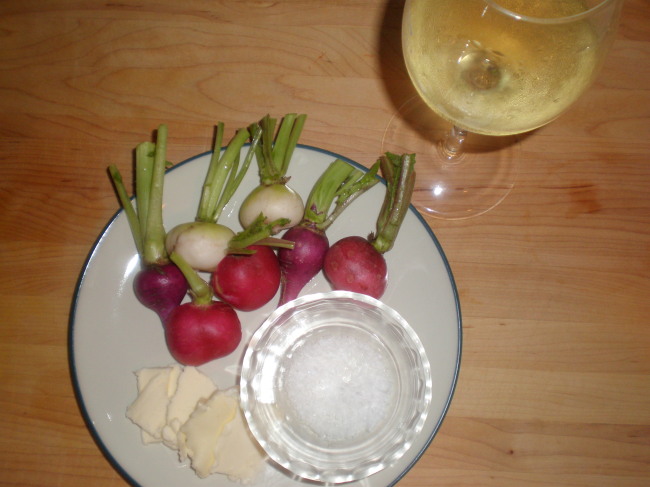
We received some boisterous radishes from our CSA box, both red and white, and decided that they should be consumed in a way more traditionnelles. In France, radishes are often consumed with sweet (unsalted) butter, and a little salt, sometimes on a piece of bread. What would go better with this than a glass of champagne? I don't know.
It doesn't have to be Champagne, mind you. Any dry sparkling white wine will do the trick. The piquant bite to the radishes would, in my opinion, pair well with a Spanish Cava, an Italian Prosecco, Asti, or Franciacorta, a Portuguese Mateus rosé or Vinho Verde, or a bottle of bubbles from California (just keep your André Cold Duck in the fridge for another day).
On a side note: according to the Gallo website, André is the #1 selling sparkling wine in America. Not surprisingly because it averages around $4 a bottle. But what's even more interesting is that they can legally call it "Champagne." Despite the fact that André is not made in Champagne France, is not likely made up of traditional Champagne vatietals, and it is most definitely not produced from the méthode champenoise, André was grandfathered in.
The radish (Raphanus sativus) is in the Brassicaceae family which also includes cabbage, cauliflower, turnip, Chinese cabbage, and horseradish. What gives radishes and many of its "cousins" their punch is a neat little system of the vegetable's version of chemical warfare.
Allyl isothiocyanate is the chemical responsible for the sharp peppery note generated by some members of the Brassicaceae family and it is what keeps animals from eating the plant. It is; however, harmful to the plant itself so it stores two otherwise harmless chemicals in separate containers within the cell walls. When something takes a bite of radish, the enzyme myrosinase is released and transforms a glucosinolate into allyl isothiocyanate.
Mmm, allyl isothiocyanate. Delicious.
Champagne, butter and radishes with some sea salt - what a great appetizer. For your viewing pleasure, I found a vintage André commercial, "Greet the season and your friends with the best, André"
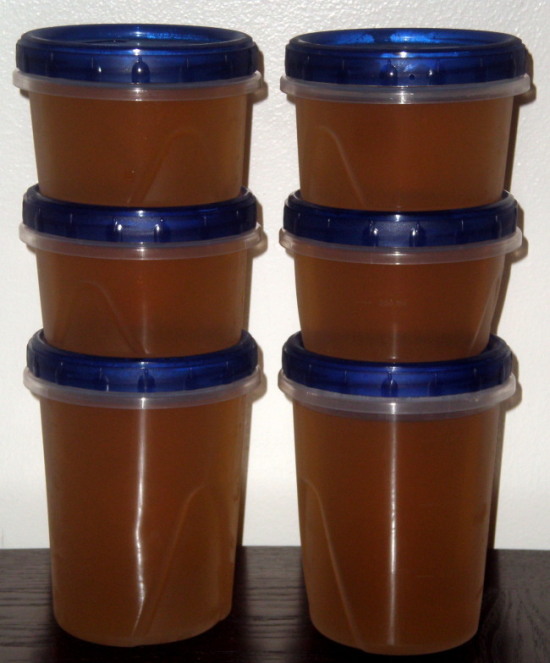
Making your own stock is easy and can save you a fair amount of money. There is really nothing difficult about it. Make a big pot of stock and the key is to freeze it into pre-measured containers. Pictured above are Ziploc's Twist 'n Loc containers, I used the 4 cup (1 quart) and 2 cup (1 pint) sizes. That way you can drop them easily into a recipe.
Save all of your vegetable scraps; tough asparagus ends, celery butts, eggplant skins, carrots that have started to go limp, your garlic that's begun to sprout, that onion half that's been sitting in the fridge for the last two weeks. Don't worry about the texture, soft veggies make a fine stock. Save and freeze all your bones as well and all your herbs that are about to turn.
Keep all of these veggies and bones in the freezer until you have a good amount. I make sure that I have about two pounds of scraps and bones for each gallon of stock that I plan to make.
Throw them all in a pot, bring to a boil, then turn down to a simmer. Keep that going on the stove for a few hours. Cool the stock as quickly as possible. One method is to fill the sink with cold water and place the stock pot in the cold water.
Water has an extremely high volumetric heat capacity so use cold water to bring the temperature down more quickly. Strain and pour into your containers. Voilà!
These Greek-style meatballs are a snap to make, delicious, and kid-friendly. The mint, vinegar, and nutmeg make them distinctly Greek, all the while playing nice together with the oregano. Adding them into pita bread with Romaine lettuce and fresh sliced cherry tomatoes with tzatziki (cucumber-yogurt sauce) make a wonderful entree for lunch or dinner.
This recipe was adapted from Cat Cora's but I changed the cooking method and omitted the flour since I wanted to pan fry the meatballs instead of deep fry.
Ingredients
3 slices white bread with crust
1 cup milk
2 pounds ground beef
1/2 yellow onion, minced
4 cloves garlic, minced
2 finely chopped tablespoons of fresh oregano
3 finely chopped tablespoons of fresh mint
2 teaspoon white wine vinegar
2 eggs beaten
1/4 teaspoon grated nutmeg
2 tablespoons olive oil
Salt and pepper
Pita Bread, white or whole wheat
Cucumber Yogurt Sauce, recipe follows
Directions
Preheat oven to 375 degrees.
Cube sliced bread and place in food processor, pulse until bread become coarse breadcrumbs. Place the fresh breadcrumbs in a bowl and add milk. Let sit for 1 minute then squeeze out the liquid and combine bread with the beef, onion, garlic, oregano, mint, vinegar, eggs, nutmeg, salt, and pepper into a bowl. Incorporate well but be careful not to overmix. Take a heaping tablespoon out at a time and roll the mixture into meatballs.
Add the olive oil to a medium-hot pan. Brown the meatballs on all sides, cook in batches so as not to overcrowd. Place browned meatballs on an oiled sheet pan (or lined with parchment) and finish cooking in oven for 10-15 minutes, or until cooked through.
Serve warm or at room temperature in toasted pita with chopped Romaine lettuce, sliced cherry tomatoes, and tzatziki sauce.
Tzatziki:
2 cups plain yogurt
1 cup seeded and small-diced cucumber
3 cloves minced garlic
2 finely chopped tablespoons of fresh mint
Salt and pepper to taste
Combine all the ingredients in a bowl and mix well.
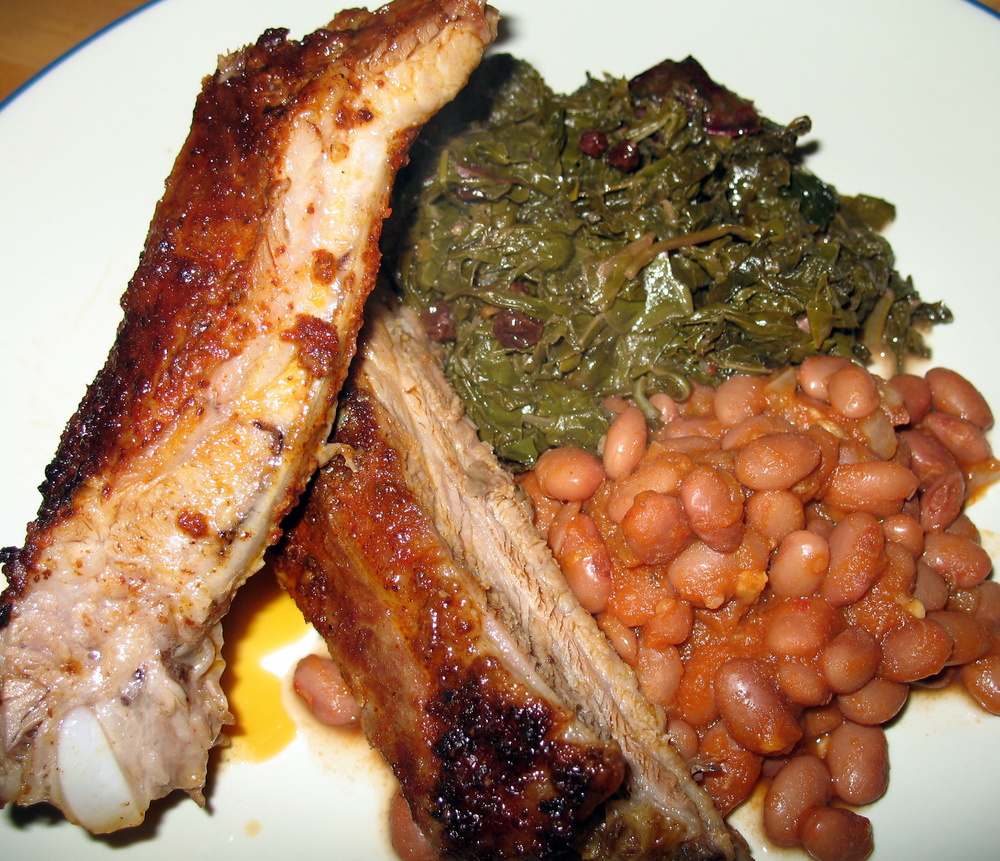
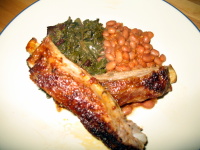
A 49er BBQ is something you can whip up in a small apartment on a foggy day with an electric stove from the 1960s and still have people second guess if it was done on a grill or not. Well, they'll know there wasn't a grill, but it'll be delicious nonetheless.
We made pork spareribs, pinquito beans, and Southern greens on a recent lazy Sunday.
The ribs are done using a technique I learned from Alton Brown. The pinquito beans are, more or less, Santa Maria BBQ style. The greens I kept Southern.
The ribs and the beans take at least 2-3 hours but the greens, once prepped, only take 5-10 minutes to cook - so plan accordingly. I started the beans with a "short-cook method," since I didn't soak the dried beans overnight, they needed to be par-cooked. Then, I made the dry rub and got the ribs into the oven. Last, I prepped the greens and put them aside to finish.
THE RIBS
1 slab of pork spare ribs
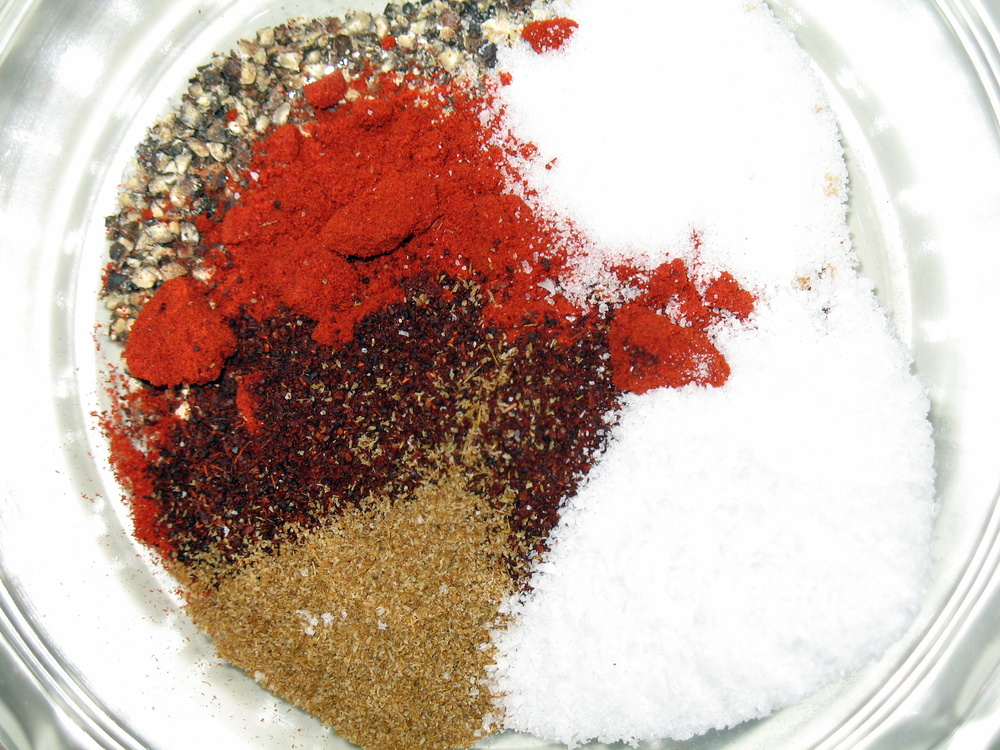
1 Tablespoon chili powder
1 Tablespoon smoked paprika
1 Tablespoon ground black pepper
1 Teaspoon sugar
1 Teaspoon mustard powder
1 teaspoon ground cumon
1 Teaspoon ground coriander
1 Teaspoon garlic powder
3 Tablespoon kosher salt
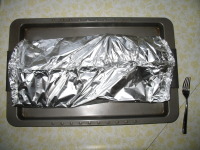
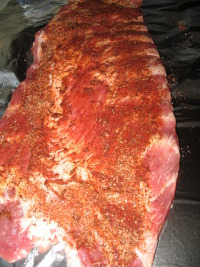
Preheat oven to 275 degrees. Trim fat from ribs thoroughly; these will be done in the oven and excess fat will not render as if it were on a grill. Lay out 2 sheets of aluminum foil, each of which are 8 inches longer than the spareribs. Lay the 2 sheets of foil on your workspace to make 1 extra wide piece of foil. Overlap an inch from each piece and crimp several times to form a tight seal. Place the ribs in the middle. Combine spices in a bowl, then generously rub across the ribs. Don't forget to get both sides.
Fold up the top and bottom of the foil together and crimp in the same fashion for a seal. Do the same with either side. You should have a tight 'bag' made from aluminium foil. Place on a baking sheet for easier transportation and in case of spillage. Place into the oven for 2 hours. Check after 2 hours for done-ness; gently unfurl the foil sides. A bone should rotate easily around the meat, indicating that everything is tender. If not, place back into the oven and check again after 15 minute increments.
Once ribs are soft, open of the foil so that they are exposed and turn the oven to broil. Baste the top of the ribs several times with the juices in the bottom of the baking sheet using a pastry brush. Watch closely because they will burn quickly; this will take about 5 minutes. When a good crust is formed, pull from the oven, close up the foir around them, and let them rest for at least 5 minutes before slicing.
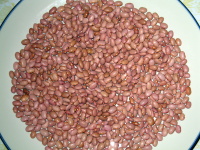
THE BEANS
1/2 pound of dried pinquito beans, also called pink beans
1 teaspoon of powered mustard
2 tablespoon of brown sugar
3 cloves garlic
1/2 yellow onion, minced
1 tablespoon salt
1 tablespoon tomato paste
1 teaspoon of ground black pepper
1 teaspoon of chili sauce (I used Srirachi)
1/2 jalapeno (I like it spicy, but you can omit this)
Sort the dried beans on a plate or baking sheet to remove any stones. Soak the beans in water overnight if you can. If you are not able to soak, place the beans into a large pot, add a gallon of water [or so] and bring it to to a boil. Kill the heat, cover, and allow to sit for an hour. This is called the "short-cook method."
Drain the liquid once complete and continue with the recipe. Once you have soaked or done the "short-cook method" with the beans, add them into a pot and add enough water to cover them by one inch. Add the rest of your ingredients.
Simmer uncovered until the beans are soft, about an hour. The level of liquid should be kept flush with the height of the beans, add water as needed.
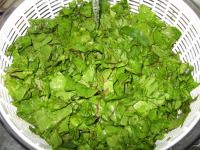
THE GREENS
1 pound of leafy greens: kale, beet, collard, chard, etc... 1 tablespoon butter 1 tablespoon olive oil 1/4 cup dried currants or raisins 1/3 cup red wine vinegar 1 teaspoon ground black pepper 1 teaspoon celery salt 1 teaspoon kosher salt
De-stem the greens and rinse/wash thoroughly. This may take several baths in water and several spins around the spinner. Chop coarsely. Since the greens take only 5 minutes, begin cooking only when the ribs and beans are done.
Add the butter and olive oil to a hot pan, keep the heat on medium-high. Once the butter is melted and begins to brown, add the greens. Add the currants, celery salt, kosher salt, pepper, and vinegar. Stir occasionally until softened and done, about 5 minutes.
Plate everything in neat little piles.
You may touch up a little BBQ sauce if you like. I'm not a total purist and if that floats your boat... then, who am I to blow against the wind?
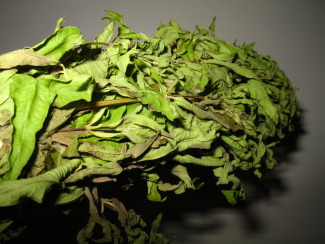
In our latest CSA box from Eatwell Farms we received a bundle of Lemon Verbena. I'm completely unfamiliar with the herb. What do I do with it? Fish? Steak? Tofu?
It smells like the essence of lemon, almost more lemony than lemons. There is also a woodsy note, not as up-front as the lemon but definitely there. Earthy, herbal, almost cedar-ish. I'm intrigued.
Lemon Verbena
So, I read a little...
The plant is native to South America and grows to a height of about a foot or so. It is often used in herbal teas, commonly with mint and lavender. It is also found in perfumes, potpourri, and sachets.
The leaves dry up quickly; within hours of being picked. The leaves are tough though, and are often removed from the drink or dish once they have added their flavor, much like bay leaves.
With each box from Eatwell comes some recipes and enclosed this week was one called Fruit in Lemon Verbena Syrup. So I figure since I'm a neophyte of the herb, let's start there... this is a variation of theirs, ad libitum.
I began by making the syrup which was "simply" water, sugar, and Lemon Verbena. I eye-balled all three but close to 2 cups water, 1 cup sugar, and 1/2 cup dried Lemon Verbena.
I brought it to a boil, then killed the heat, and allowed it to cool.
Then I sliced up some fruit. I used Cantaloupe, Oranges, and Strawberries.
Cantaloupe
Oranges
Strawberries
By the way, Eatwell's Strawberries are some of the most delicious I've ever had, and I grew up in California, which produces more than 85% of the US' strawberries.
What I noticed at a glance was how much smaller and darker they are than what you normally find.
Also, when I bit into them, their seeds were more pronounced than what I'm used to. Not unpleasant, but you notice them more.
I put the Lemon Verbena Syrup in a squirt bottle and hosed down the fruit salad with what may have been 2 tablesoons of it. I finished it by topping it with Goji Berries.
The extra syrup I think will make some fun cocktails, specifically, I think it would go well with gin. Both have that herbal/woodsy flavor; gin deriving its dominant character from juniper. I'll let you know.
My friend Terence, god bless him, makes oatmeal like clockwork every morning. He not only does it the old fashioned way (with steel-cut oats) but he does it with such panache, that he makes oatmeal something worth writing about.
Here is a short interview with him about his morning ritual.
Me: So what's the recipe? Terence: Four to one: water to organic steel cut oats. Boil, then lower heat and simmer for 5-15 mins, depending on how watery you like your oatmeal. I do 5 mins, then leave covered for another 10 mins (I use water that is filtered 3 times with reverse osmosis then stored in a glass dispenser, I don't like the taste of plastic in my food).
Then I add raw almond butter (it tastes much better than roasted), dried tart Morello cherries (they help reduce inflammation especially for people with arthritis - take a handful a day for 2 weeks and you'll notice a difference, they sell them at Trader Joe's), banana, (I also use papaya, strawberry, boysenberry, peaches, or nectarines), and a little Grade B maple syrup (again, Trader Joe's, buy the one in the glass container its easier to pour the correct amount, and doesn't taste like plastic), and always... cinnamon.
Me: Why steel cut oats? Why not the oatmeal with the guy with the funny hat we all know and grew up with ? Terence: Steel cut oatmeal leaves the oat closer to its original form. By leaving the grain intact it makes it a more complex carbohydrate so it passes through your body slower and doesnt turn to sugar as quickly as the flat 5 min stuff (garbage).
Me: Why organic, does it really matter with grains? Terence: Since only hippies buy steel cut, most that are sold are already organic. The organic oats sold in the bins at most health food store are not that expensive, so its worth it to not eat pesticides.
Me: Do steel cut oats have oat bran? Remember oat bran from the 1980's? They were putting that stuff in everything! I think I even had some cotton candy with it at the county fair! Terence: The more intact the grain is the more fiber it will have, and in general the less processed the grain is the more complex the carbohydrate.
Me: Oatmeal takes so long to make. What's the deal? Any tips to make it faster? Terence: The grain takes longer to absorb water because it hasn't been mashed to pieces. There is nothing wrong with boiling it at night and leave it on the stove top, covered. Just reheat it in the morning.
Me: Remember when we were at the farmer's market and you got that huge box of bruised peaches for like $5? What other fruits are prone to having "blems" that the farmers are willing to part with, on the cheap? Terence: Ask for the ripe bin at any farmer's market stand who sells fruit that bruises, you get the best, ripest tasting fruit for a quarter the price.
Me: What is the oddest thing you've put in there? Flax seed endosperm? Bee pollen? Fried grasshoppers? (Do insects count as vegetables?) Terence: I also have put organic plain soy yogurt (I don't like the sugar infused one).
Terence's Oatmeal (serves 2)
Bring 4 cups of water a boil, add 1 cup of organic steel cut oats. Cover, and simmer for 5-15 minutes (to your desired consistancy).
Meanwhile, slice a banana, a papaya, and an apple. You can use any fruit you have on hand but these three in particular go increadibly well together.
When the oatmeal is done, scoop it into a bowl and add the fruit. Next add 2 tablespoons of raw almond butter and sprinkle a teaspoon of cinnamon on top. Lastly, drizzle a tablespoon of Grabe B maple syrup.
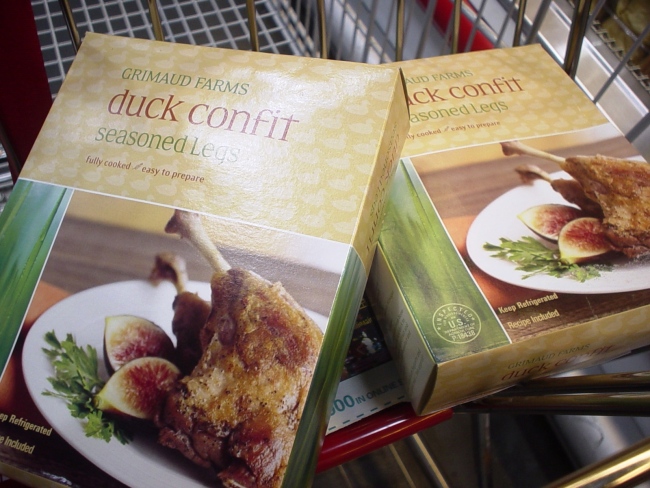
Eat more duck? I don’t know why we (Americans) don’t eat more duck. I just had a pan roasted duck breast with coca sauce, served on a bed of lentils with cipollini onions the other day at Citizen Cake here in San Francisco, and throughout the meal I could not stop asking myself why I don’t eat more duck. I love duck.
Duck has so much more flavor than chicken, and roasted duck fat and crispy skin surpasses that king of fatty delicacies bacon any day. And, I really love bacon. But, duck is another realm of sensuous eating pleasure. Duck is like an affair with an exotic beauty who barely speaks your language. Bacon is a fling with the hot bartender around the way.
Duck is never mentioned in those poultry scares. I cannot remember any duck recalls, bans, poisonings, or governmental white papers against it. The only thing we hear about is the whole foie gras flap. Is it cruel, or is it not cruel? If I were a duck I think I would say it is cruel to force me to eat when I do not want to eat, but if I were a duck I would also feel the evolutionary need to stuff myself silly for the long flight South and would feel it even more cruel if my keeper did not feed me all I crave to eat. Other than that duck is free from controversy (to my limited culinary focused knowledge).
So why do we not eat more duck? Expense? Hell yeah, that’s one reason. Duck is expensive here in the States. You may give the old chicken purchase the once around the brain and compare it to the cost of hamburger, but duck…that’s a stop and ponder this for awhile purchase.
Availability? Yeah, that is also a problem in most areas. You can’t just pop down to the market and pick up a fresh duck or duck breast. Well, I live in San Francisco, and I can go to Chinatown and have them slaughter the duck of my choice for me. If I was inclined to do that, and if my Cantonese was up to snuff to get it done. I assure you, I have not and it is not… so relax. But availability is a problem because the only duck you are going to find is more than likely whole and frozen, and then you have to plan, thaw and wait. Ok, duck seems really impractical now.
Treatment? This is the last obstacle I see with duck. Not the ethical treatment of them; although, that crosses my mind too. I mean how should you cook it? Should you butcher it and pan roast or grill the breast, and make confit out of the legs and thighs? Or, should you break out the bike pump and fan and Peking that sucker? That’s the dilemma.
If I was Chef Gary Danko I could turn it into duck breast prosciutto, but there is only one Danko and I am not he. If I was uber Chef Thomas Keller, I could create some dish out of duck that could revive the dead, but I am not Thomas Keller either. I am just an ordinary cook who loves duck and cannot get past the Expense, Availability, and Treatment of duck in order to EAT duck.
If I lived in France, I don’t think I would have this problem. I could buy fresh duck breasts, pay a bit more for it than chicken, go home and pan roast them, and use the rendered duck fat to fry some potatoes. I could eat duck at will, and then ponder why I don’t eat more pheasant. I’m still going to try and eat more duck.
My wife Ari and I worked a little later than usual on Friday and both of us had a long week, so we were pretty set on dinner-in. Went to Whole Foods without knowing what we were going to eat. Scoping out the seafood section, we spotted some scallops, then checked out the meat department and couldn't resist the Aged Rib Eyes that were staring us down.
Our favorite cut is a Rib Eye - but what was difficult was whether to go with the scallops, or the meat. Why not Surf & Turf? We went with both. We actually bought 2 rib eyes to begin with, but when we got home and saw how much food we had, we quickly realized that 4 scallops (weighing over half a pound) and a single rib eye (almost a pound) was going to be PLENTY of food.
The other Rib Eye is now sitting uncovered on a plate in the fridge and will be turned daily until about Wednesday. This is a trick I learned from my buddy Sage, but have yet to try. It is supposed to be awesome.
Browsing the produce section for a bit, we decided to go with a couple large artichokes. We needed to make a decision quick because Ari's eagle eye had spotted the cheese samples from about 40 yds away...
For the wine, we went with a Pinot Noir since we had both red meat and shellfish on the menu. Pinots are my "go to" when I'm not sure what to pair with. You really can't go wrong in my experience. Of course I'm still learning, so all wine tips are welcomed!
Give the 'chokes' a 20 minute head start in the steamer. For the scallops, wrap them around with bacon and skewer them with a rosemary sprig. Set them aside. Start with heating a heavy cast iron pan (our "go-to" pan) by putting your stove on a medium-high heat. Once it is hot, sear the first side of the Rib Eye well, about two minutes. Give it a flip then turn the heat down a notch.
By now the pan should have plenty of juices and the scallops are ready to throw in. Give the scallops 2-3 minutes on each of the 4 sides to thoroughly cook the bacon. About 10 minutes total. When everything is done, flip the steak once more and butter the top to add a little more deliciousness as well as tie in something that you'd usually have with seafood (butter).
When you serve it, put a little extra dab of butter on the other side of the steak as well; that makes for more sauce to dip the scallops in. Ari whipped up some creamy balsamic to dip the chokes (mayo and balsamic). The wine had been poured and given time to breath, and we were ready to chow down. Awesome meal, and about half the price of going out - which we usually do on Fridays.
Summer is just around the bend, and the smell of early evening BBQs (or as some of you say ‘cook-outs’), in the air is already abound. Good people, good food, good beverages, good times. While there always must be a meat, or a variety thereof to make a great BBQ, I love the sides, and one of my favorites is chili accompanied by cornbread.
It most recently reminds me of a 4thof July BBQ at my old greasy spoon house—no offense guys—on Bay Street in San Francisco, a fun day indeed!
Chili and cornbread for a BBQ you say? Yes, and here is why. It’s the perfect side for all of your favorite meats OR vegetables. Slathering chili on your burger or hotdog immediately adds a tremendous amount of texture and flavor, and if you stock up on some small bowls, it also makes a great starter.
A pot of chili can easily stay warm if you have a burner on your grill, or even in a closed container outside. Some of you might eat cornbread with the chili, but it can also serve as a desert, which is what I prefer. Nothing better than hot cornbread slathered in butter and honey. “More please!”
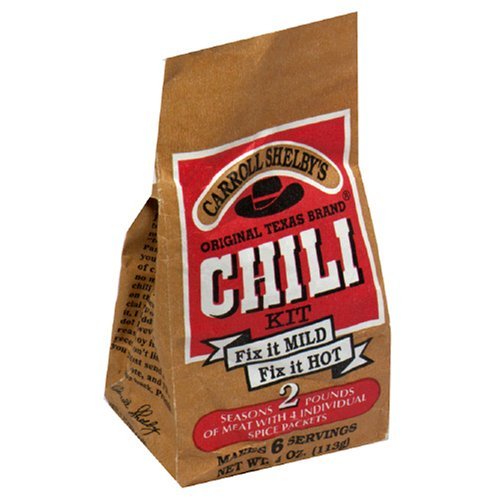
My favorite recipe for chili comes from my mother Pam "Pamcake" Wilkinson, who still makes chili every once-in-awhile when I come home and visit—especially for me. And for all of you folks like me who sometimes take the easy route in cooking, Mrs. Wilkinson’s specially-kept-unrevealed-until- today secret makes it a painless process—Carroll Shelby’s Original Texas Brand Chili Kit.
And just like the saying goes, good things come in small packages, the only thing I’d add to that is, sometimes in small brown packages (as shown below). Carroll Shelby’s is usually available at your local grocery store, or you can order it online.
Carroll Shelby's Original Texas Style Chili
Ingredients
2 pounds ground beef
1 8-ounce can tomato sauce
2 cups water
1 package Carroll Shelby's Chili Kit (contains all of the essentials below):
-1 chili packet for seasoning
-1 packet of cayenne pepper
-1 packet of salt
-1 packet of masa flour for thickness
Option to add beans (I always do, and prefer white beans, although a can of kidney would work as well)
For chunkier chili, feel free to add canned tomatoes to taste
Instructions
Brown ground beef in large skillet. Drain fat. Add tomato sauce and water. Add Large Spice Packet and salt to taste. For spicier chili, add cayenne pepper (small red packet*). Cover and simmer for 45 minutes, stirring occasionally. Serve piping hot. Makes 5 servings.
*I like spice, so I always heat it up with the cayenne pepper
Hey history buffs, there actually is a Carol Shelby, and he’s a former race car driver that had a chili recipe named after him. If only we could all be so lucky.
And for all of you that are counting your calories, which I sure as heck should be, you can find calories and nutritional information here.
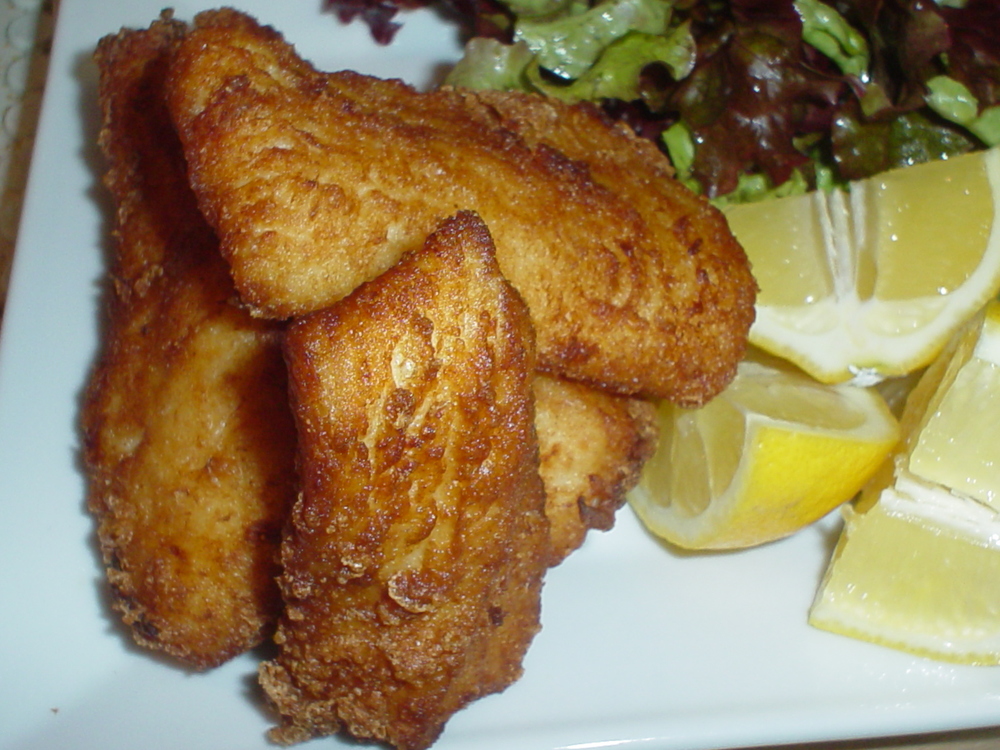
Halibut, I love Halibut so much that I eat it three to four days a week when it’s in season, and thank God it is back in season now. Halibut season runs from March until the middle of November. The span in-between I call hell because I am deprived of the luscious white, sweet, meaty treat called halibut.
I live in San Francisco and people here go on and on about salmon and Dungeness crab, ad infinitum…ho-freaking-hum. There is no salmon dish baked, roasted, steamed or raw that can come close to a basket of properly beer battered, deep fried, halibut.
The crisp, crunchy, golden brown exterior and the steaming hot tender fish inside is food porn to me. I want to close the blinds, conceal myself from prying eyes while I give myself over to this unmatched sin.
A drop of lemon or lime juice with the first bite, and then a dollop of my homemade tartar sauce with the second, and I’m half way to being spent. My deep fried Halibut is crisp and golden brown on the outside with white, nearly, luminescent flesh, shrouded in a mist of escaping steam on the inside.
My mouth knows it will be tender and sweet. It seduces me to take a bite. I bite, munch, and gorge. Before I know it, I end the evening sprawled on my couch, flakes of fried batter clinging to my face. A sudden rush of guilt washes over me…shame not too far behind. I pick myself up and tell myself I will have more self control next time…tomorrow


